Pay-Per-Input Legacy
RealityCapture is now free for students, educators, hobbyists, and companies making under $1 million USD in annual gross revenue. Subscription seats are available for $1,250 USD per seat per year for companies over that threshold.
As a result of these changes, we no longer offer a Pay-Per-Input (PPI) pricing model or a separate PPI license of RealityCapture. If you currently have unspent PPI credits, you’ll be able to use them for 12 months with RealityCapture 1.3.2 or prior.
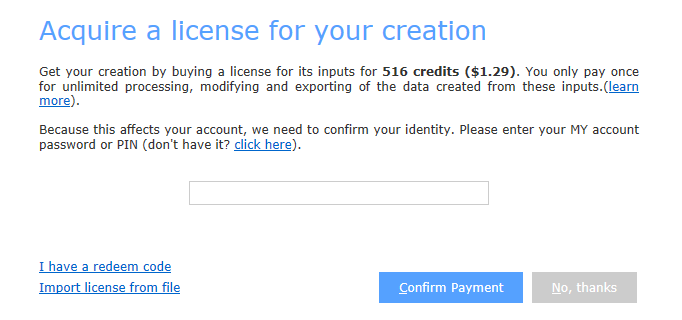
The PPI licensing model diverges from the standard licensing approach by applying licenses directly to your inputs. To be able to license your inputs, it is required to possess an adequate balance of PPI credits in your account, along with a PIN to authenticate your identity.
The following section covers principles of PPI licensing, how to acquire the licenses, export and re-import them. In general, you do not need to do the latter unless you want to archive your licenses, share them with your colleagues or friends, or transfer them to another computer for offline processing.
Licensing Inputs
The PPI licensing is triggered on export. Once you decide to export your creations or a license file, and you have enough credits in your account, you will be asked to use your PIN to verify your identity and license your inputs.
Creating a PIN
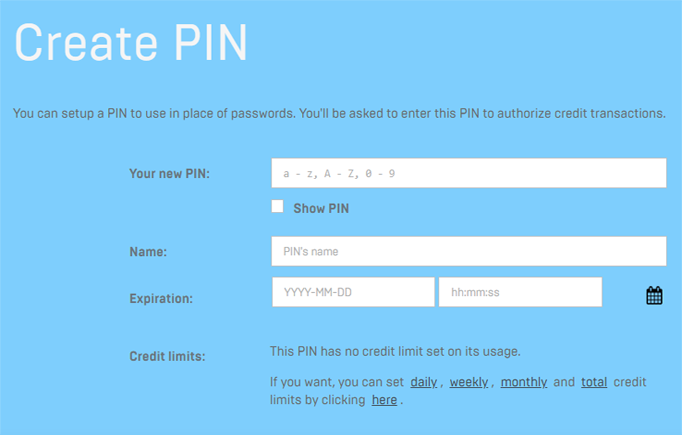
A PIN is needed to verify your identity when licensing your inputs. It can be created in your account in the section My Pin.
- Your new PIN Set your PIN. This is the only required field.
- Name Setting the PIN name is not required, but it can be helpful when managing your PINs. When left empty, the PIN name will be the date and time when it was created.
- Expiration Set the expiration date if you want the PIN to expire after a certain date.
- Credit limits Create credit limits to restrict the PIN usage.
All PINs are listed in the Your PIN List.
Input Licenses File
The Input Licenses file contains all license for inputs in the project in which it was created. It can be exported before or after the inputs were licensed. If the inputs were not licensed, the export of a input licenses file will trigger the PPI licensing.
To export the Input Licenses file, go to the 3. Output part of the WORKFLOW tab and use the Input Licenses button. This will open the Windows File Explorer to set the name of the Input Licenses file and the location where it is going to be saved. In case your inputs were not licensed beforehand, it will first open the Acquire a license for your creation window.
Importing Input Licenses File
The Input Licenses file can be imported to a project to apply the existing licenses to the inputs which were licensed when the Input Licenses file was exported.
- Place the Input Licenses file into the same folder where the inputs are located. When importing the inputs, the Input Licenses file will automatically be read.
-
Use the Input Licenses button located in the Import & Metadata panel of the WORKFLOW tab to import a Input Licenses file.
-
Licenses can also be imported during the license acquisition. In the Acquire a license for your creation window click on the Import license from file button in the lower left corner. This will display a Windows file explored window. Find the license file and click on the Open button to import it.
NOTE: For licensed inputs you can find a small L icon inside a square in the list of your project inputs. The L sign is also shown for components and models created from licensed inputs.
Look for it in the 1Ds panel. See the screenshot below:


Open PPI Scenes on Different Computers
Projects created with PPI can be reopened on eight different computers. To correctly use this feature, you cannot use anonymous mode to activate RealityCapture. If you create a project using anonymous mode, you can still convert it into a transferable project by signing in and opening it on the same computer.
-
A running session of RealityCapture has to be closed first to let you transfer the project successfully due to the .lock file located in the project folder.
-
The user must be connected to the internet when opening the transferred project on another computer.
-
Licenses for the images transfer with the project as well.
-
To see all users/computers that contributed to the project (saved the project), open the .rcproj file in a text editor. At the very beginning of the file, notice the contributors section. Each line represents a pair of user-computer.
-
Components cannot be transferred as they do not have contributor information included. Include them in a project and transfer the whole project.


