Animation Tool
This tool enables you to create and modify animations of your reconstructed models (edit the camera path and change views on your model),
generate, play and reload videos of it, all directly in RealityCapture.
Basic Workflow
- Use the application '1+1+1 Layout with Console' and open the 1Ds panel, two 3Ds views and the 4Ds panel,
- Display a reconstructed model in a 3Ds view,
- Go to the ANIMATION 4D context tab and turn on the display of 3D path, keyframes and the camera by ticking off all 3 options,
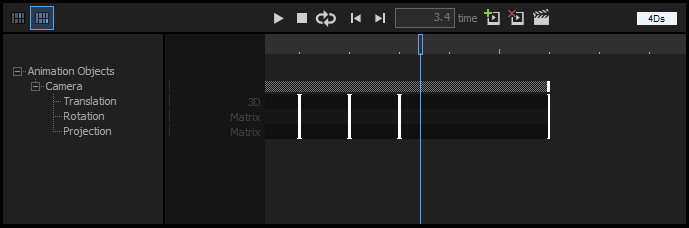
- Expand 'Animation Objects' in the left menu of the 4Ds window (see the picture below) - click the plus sign next to the term 'Animation Objects'; expand also 'Camera'
in the same tree,
- To change a 3Ds window to show your animation in, click the 2nd button located in the upper-left part of the 4Ds panel
- this can be applied also in the 6th step,
- Create key-frames (positions at the video timeline) in the 4Ds view - follow these steps:
- rotate, move, and/or zoom in/out your scene to get another view of the model that you want to be used in the animation;
you can also make use of the numpad shortcuts for quick setting of standard views (see at the bottom),
- click the Add a key-frame button (see tooltips for the 4D buttons) accessible from the top of the 4Ds panel -
this will create a starting point of the camera trajectory both in the chosen 3Ds and the 4Ds view,
- adjust the view and create another key-frame doing the same - you can alternatively right-click the timeline area in the desired position and add a key-frame
from this context option, or Ctrl + drag a created key-frame; you can even use the Insert button to add a new key-frame;
the last option is to double-click the camera in the 3D view,
- if there happen to be 2 frames placed on each other or you want to move the position of any of them, just drag the newly created frame to a side
in the 4Ds timeline - this will also prolong the camera trajectory between the 2 framed views,
- add as many key-frames as you like - please note that each new key-frame is added under the blue slider knob line in the 4Ds,
when the knob is placed within the created key-frames, otherwise it will be placed behind the last frame.
- Modify the camera path in the 3Ds according to your liking - you can slide the camera on the blue 3D path; when it is double-clicked,
you can rotate the camera widget in 3 directions by dragging one of the circles in the desired direction; to change the camera coordinates,
do the same with the camera pivot (showing the camera 3D coordinates system); see also section 'Selected key-frames panel' at the bottom of this tutorial,
- Review (play the animation) and modify your creation until satisfied,
- Render and save your animation using the last button in the top menu of the 4Ds window.
TIP: Ungroup a key-frame to be able to use different settings for translation, rotation, and/or projection of the animated camera object.
For example when you want to move the camera along a straight corridor, and in turns look at the sides as you go, use 2 key-frames for the position (front and end of the corridor) and turn the camera
first to one side, next to the other.
How to go about ungrouping key-frames, see in the section 'Animation' below at this page.
Buttons in the 4D Window
- Pair Views These buttons (in the upper-left part of the 4Ds panel) apply the current 4D parameters to the selected
3Ds view. A replayed animation will be displayed in the paired 3Ds view. Camera key-frames will be added from the view.
- Play/Pause plays or pauses an animation, when the blue slider knob line is positioned within the timeline in the 4Ds window,
except when it is at the end and the Loop function (see below) is turned off. To play the video again in this case, move the blue line to the start and hit the Play button.
- Stop pauses an animation being played and jumps to time 0s (to the animation start).
- Loop On/Off When an animation hits its end, it will be replayed again. Click the toggle button again to stop the looping.
- Prev key-frame jumps to the previous key-frame.
- Next key-frame jumps to the next key-frame.
- Add a key-frame adds a new key-frame (from a paired view).
- Delete the selected key-frames deletes the selected key-frame(s). For advanced selection options, navigate to the Key-frame controls below.
- Render animation renders a video from the created animation. In case of animation with zero length, it will render just one frame - an image.
Click here to learn more about the video export settings.
Other Controls
Timeline
| Action |
Description |
| Right-mouse drag up/down / Ctrl + mouse wheel |
Stretches the timeline to the sides. |
| Left-mouse drag |
Moves the timeline blue slider knob line to the dragged side. |
| Shift + left-click / Shift + drag |
Shows the frame in the paired view. |
| Right-click in the timeline area |
Shows the context menu Add a key-frame (adds a camera key-frame to the clicked position). |
| Left-mouse drag |
Changes time. |
| Left-mouse drag + Shift |
Changes time and replays an animation in the paired view. |
| X |
Jumps to second X (e.g. 0.05.) |
| Xs |
Same as above. |
| Xm |
Jumps to minute X. |
| Xh |
Jumps to hour X. |
| XsYmZh |
Combination of the last three options above - jumps to hour Z, minute Y, and second X. |
Animation
| Action |
Description |
| Right-click on a key-frame (a vertical line in the timeline which spans these rows: 3D, Matrix, Matrix) |
Shows the context menu:
Update the key-frame (updates values of the camera key-frame from the paired view),
Group/Ungroup the key-frame (combines multiple key-frames to one, breaks a key-frame to multiple separated key-frames, e.g. one camera key-frame to the translation, rotation, projection key-frame).
When you want to group an ungrouped key-frame again, you need to put all its parts under each other to form one vertical line.
Then just right-click on the line and left-click 'Group the key-frame'. |
| Dragging the middle part of the 'Camera' row in the timeline |
moves the animation on the timeline. |
| Dragging the borders of the 'Camera' row in the timeline |
scales the animation panel with snapping to the nearest time frames. |
| Dragging the borders of the Camera row in the timeline + holding Shift |
ignores snapping to the nearest key-frames/time. |
| ANIMATION 4D/Show 3D Path |
Tick on/off to display the created camera path in the 3D view. |
| ANIMATION 4D/Show Camera |
Enabled only when the animation path is visible. Tick on/off to display the camera widget in the 3D view. |
| Drag the camera in the 3Ds view (on the blue 3D-Path line) |
to change time and display a frame in the paired view. |
Key-frames
| Action |
Description |
| Drag |
to move with snapping to the nearest time. |
| Shift + drag |
Moves and ignores snapping to the nearest key-frames/time. |
| Ctrl + drag |
Copies the selected key-frames. |
| Left-click |
Selects a key-frame in the 4Ds and displays its properties in the 1Ds. |
| Ctrl + left-click |
Adds a key-frame to / removes it from a selection. |
| Shift + left-click |
on the chosen first key-frame and the same action performed with the last chosen key-frame selects all key-frames between the first and the last. |
| Left-click on the 'Camera' row in the timeline |
Selects all key-frames. |
| ANIMATION 4D/Show Keyframes |
Enabled only when the animation path is visible. Tick on/off to display the created key-frames in the 4Ds view. |
| Click a key-frame (camera pyramid) in the 3Ds view |
to select the key-frame. |
| Click the key-frame |
to display the manipulation widget in the 3Ds view. |
| Double-click the camera in the 3Ds view |
to add a new key-frame. The new one may be added as a copy at the same position. In such case simply drag it away to change its location.
Also, once the camera is double-clicked, a orientation widget shows up in the 3D view, enabling you to rotate it by dragging 1 of the 3 circles in the desired direction,
plus a camera pivot, allowing you to change its 3D coordinates. |
Selected key-frames panel
This panel will show up in the 1Ds panel, when you click on a key-frame in the 4Ds view.
Time Duration of the selected key-frame. Retyping this value will change the frame position on the timeline. When all key-frames are selected,
the number typed here will also create a new key-frame in the 4Ds (unless it already exists), otherwise it displays the key-frame in the 4Ds.
-
Camera position
x/y/z 3D coordinates of the camera. You can change these values to adjust the camera position assigned to the key-frame in the 3Ds view.
-
Camera rotation
Camera Rotation Type
- Classic (yaw, pitch, roll) Yaw/pitch/roll angles in degrees. You can change these values to adjust the camera rotation assigned to the key-frame
in the 3Ds view.
- Look at uses these two additional parameters:
Camera looks at point - defines coordinates of a point for the camera to focus on. See changes in these values in the 3Ds view.
Camera up vector - defines a direction of the camera view, is used to set up the camera roll, at least one coordinate has to be of a non-zero value. See changes in these values
in the 3Ds view.
-
Camera projection parameters
Focal length / zoom A focal length for the perspective view, distance of the focal point from the camera centre, smaller focal length results in a larger field of view;
zoom for the parallel projection.
Projection Perspective or Parallel.
Shortcuts
| Shortcut |
Action |
| 0-7 pressed once in a 3Ds view |
pairs views: 0 for perspective, 1 for the parallel view, 2 for the top view, 3 for the bottom view, 4-7 for the side views. |
| Space bar |
Play/pause the animation. |
| Esc |
Stop the animation. |
| Home |
Jump to time 0.0 (animation start). |
| L |
Toggle loop. |
| Del |
Delete the selected key-frames. |
| Insert |
Add a key-frame (from a paired view). |
| <- |
Jump to the previous key-frame / Move the key-frame left (if selected) + 0.1s. |
| -> |
Jump to the next key-frame / Move the key-frame right (if selected) - 0.1s. |
| + |
Add 1s. |
| - |
Substract 1s. |
| CTRL + |
Add 0.05s. |
| CTRL - |
Substract 0.05s. |
