Metadata (XMP) files
The metadata or XMP files contain information about the images that can be used to replace the image EXIF information or to re-use the alignment configuration. They can be helpful when setting up a camera rig, where the camera positions won't be changed.
-
The XMP files are directly connected to the images. If placed in the same folder, an image and an XMP file with the same name will act as one when imported into RealityCapture. All information from the XMP file will automatically be assigned to the corresponding image.
-
An image should have the same name as its XMP counterpart. For example, to assign an XMP file to an image named Image01.jpg, the XMP file should be named Image01.xmp.
- It is possible to use a CLI command addImageWithCalibration to import an image and the corresponding XMP file. In this case, the two files don't have to have the same name or be placed in the same folder.
Export XMP files
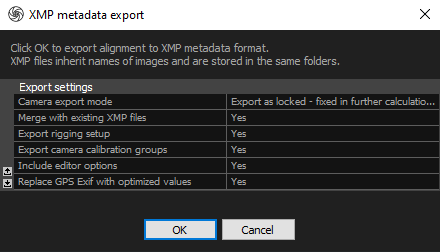
To export the XMP files, it is necessary to align the images first since they contain information calculated during the alignment. Once finished, use the Metadata (XMP) button in the Export section of the ALIGNMENT tab to start the export. This will open the XMP metadata export window.

- Camera export mode Specify the camera position and how they are going to be used in the further calculations.
- Export as draft The draft export option utilizes absolute camera positions, but they are subject to adjustment during the alignment process.
- Export as exact Choosing the exact export option ensures that the cameras maintain their relative positions. This option is suitable when preserving the spatial relationships between cameras is crucial.
- Export as locked The locked export option combines the preservation of both relative and absolute camera positions. Unlike the draft export, the positions remain fixed and are not adjusted during the alignment phase.
- Merge with existing XMP files Creating new XMP files for the same images will result in the replacement of existing ones.
- Export rigging setup Enable to export the rig setup information when using the laser scans. If disabled, only the position and orientation information will be exported.
- Export camera calibration groups Export the information about the calibration groups. More about the calibration groups here.
- Include editor options Enabling this option signifies that the images are enabled for texturing and meshing processes. This information can be found in the Selected input panel.
- Replace GPS Exif with optimized values Use the coordinates calculated during the alignment instead of the EXIF coordinates.
Have a look at the sample XMP file content:
<x:xmpmeta xmlns:x="adobe:ns:meta/">
<rdf:RDF xmlns:rdf="http://www.w3.org/1999/02/22-rdf-syntax-ns#">
<rdf:Description xmlns:xcr="http://www.capturingreality.com/ns/xcr/1.1#" xcr:Version="3"
xcr:PosePrior="initial" xcr:Rotation="-1 0 0 0 0 -1 0 -1 0" xcr:Coordinates="absolute"
xcr:DistortionModel="division" xcr:DistortionCoeficients="0 0 0 0 0 0"
xcr:FocalLength35mm="18" xcr:Skew="0" xcr:AspectRatio="1" xcr:PrincipalPointU="0"
xcr:PrincipalPointV="0" xcr:CalibrationPrior="initial" xcr:CalibrationGroup="-1"
xcr:DistortionGroup="-1" xcr:Rig="{1E204070-A17D-444E-9455-493C15B37B93}"
xcr:RigInstance="{2DC9F356-432F-4234-9148-DC2655788342}" xcr:RigPoseIndex="3"
xcr:InTexturing="1" xcr:InMeshing="1">
<xcr:Position>0.262424475861358 -2.26397531586648 7.03879070281982</xcr:Position>
</rdf:Description>
</rdf:RDF>
</x:xmpmeta>
TIP: You can add one XMP file named _common.xmp to the folder with your images to import all of them with the same XMP information.
