View Types
RealityCapture distinguishes various view types or aspects of views. Based on the chosen view type, information that is displayed can be textural, graphical, or 3D information. Further, there are special types of view aspects, such as a console and help.
To change view types, click and hold with the left mouse button on the Aspect button in the top-right corner of a view window and release it over the view type that you want to use.
View types selection may differ for different layouts and different layout slots. It should look like this:
As seen in the image above, view types are not divided just by the information that they display, but they are also color-coded.
- Light gray Corresponds to the color cursors. Aspects, that can be used with the item of the same color cursor as the view will be displayed as light gray.

- White Aspects that can be used with the item currenlty displayed in that view will be white.

- Beige These are the independent aspects. You can use them, but they do not correspond either to the color cursors or to the item currently displayed in the view.

- Dark gray The special aspect such as console and help.

View type usage
-
1Ds - Scene View 1D
This view displays hierarchical relations among all objects.
Use this view to access all the information available about the inputs, components, models, or various settings.
It is not possible to use this view type with the Single View layout.
-
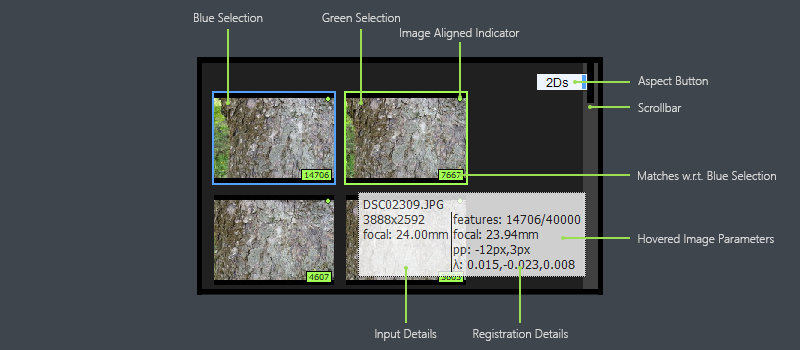
2Ds - Scene View 2D - thumbnail view
An easy view to all inputs figuring in the scene.
The brief information is accessible in this view - such as whether the input has been registered or not. There is also an information panel in the lower-left corner of the view in which information about the input shows up. This information shows for the input over which the mouse cursor is hovering.
It is not possible to use this view type with the Single View layout.
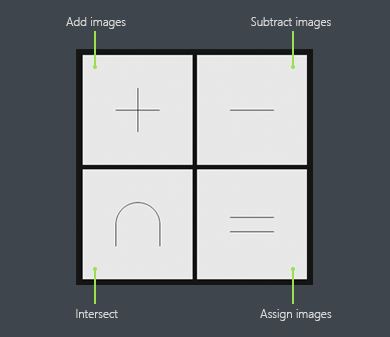
When you drag and drop into a 2Ds view, you will see the following options:
Images can be DRAGGED from other 2Ds views, also from the 1Ds view, and you can also make a camera selection in the 3Ds view,
and hold CTRL key to drag into the 2Ds. All of these dragging methods will give the options shown above. Add and subtract are self explanitory. Intersect will leave
images that are both already in the 2Ds view and also in the image selection being dragged in. Assign will make the 2Ds view show a fresh selection of only the images being dragged in.
-
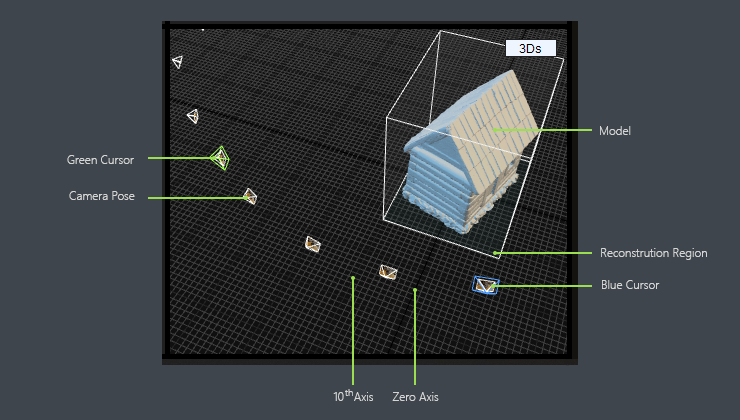
3Ds - Scene View 3D
Shows 3Ds scene relations for the currently selected component and model.
-
4Ds - Scene View 4Ds
A panel for creating, modifying (editing the camera path and views) and playing animations of your reconstructed models.
You can have only one 4Ds window open at the same time.
-
1D - Input View 1D
Displays all the available textural information and calculated outputs about the selected input.
-
2D - Input View 2D
This view type displays 2D image content of the selected object, e.g. an input image, a laser scan, an orthographic projection, or an elevation map.
Based on the input type, the application context ribbon is updated. The corresponding context ribbon then provides additional display options and tools, for example a ray-of-sight tool or distance measuring tool.
To display 2D image content, simply drag and drop an image, a laser scan or an ortho projection to a 2D view.
When an image is displayed in the 2D view, in the lower-left corner the path to the image can be seen, as well as the information about whether the image is registered in the selected component. If it was registered, but not in the selected component, the name of the component in which it is registered will be displayed.
-
Con - Console View
Use this view to track the application progress and create command sequences.
-
Help - Context Help View
This is the help view window. The application help provides many useful resources and can guide you to accomplish your goals.
Press the F1 key at any time to open the help.
-
Map
Choosing this view type opens the 2D version of the map view that contains the basemap of the chosen Map Provider and other map objects (control points, ortho projections). After choosing the map view, it is possible to choose between the 1D and 2D versions of it by using the Aspect button again and choosing one of the white options (1D or 2D). The Map 1D version of the map view contains information about the map provider and can be used to enter an access token since it is required when using some providers.


