Create a 3D Model from Laser Scans
RealityCapture allows automatic registration, filtration, coloring, texturing and meshing of laser scans. You are not limited by a number of
laser scans and size of your project, even if the amount of data reaches terabytes.
You have already imported a laser scan to the project. Congratulations! You can skip the import step of this tutorial and create
a 3D model from it or press ctrl+N to create a new scene and import the laser scan again.
Laser Scan Import
RC supports PTX, E57, and ZFS/ZFPRJ laser-scanning file formats. Importing converts laser scans into an internal format with the .lsp file extension. Once laser scans are converted to .lsp files, you can work
only with .lsp files as with images. There is no need to import laser scans again. You would only need to re-import laser scans if you wanted to change the import options.
- To import laser scans, simply drag and drop them into your project. Alternatively you can click the Laser Scan button in the WORKFLOW tab, then select from available import options and define the source folder.
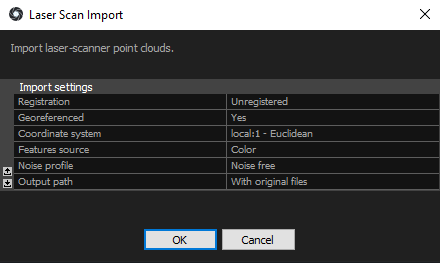
- Default laser scan import options (the pull-down menus' options are listed and explained in the text that follows):

For registration select one of the following:
Exact Imported poses will be preserved; in this case the imported model defines the scene coordinate system.
Draft Scanning stations have been registered but the registration needs to be fine-tuned.
Unregistered When the stations have not been registered, the registration engine will calculate poses of all scans.
Geo-referenced Set this option to Yes when your laser scans are geo-referenced and you want this type of data to be
included in your project. When set to Yes, you will also need to specify the coordinate system.
Features source Select whether to use a color or a laser intensity channel for registering photos to laser scans.
Color is the default value. For Z+F scans use Color if there are corresponding .jpg files next to the source files.
Noise profile defines how the point cloud precision changes with the growing distance from the scanner station and
laser intensity value. You can select Noise free profile, ScanStationP20 or define your own profile based on the laser scanner technical documentation.
To add a new profile, edit the noiseprofiles.xml file. You can find it in the application executables folder.
Output path Specify a target folder for .lsp files.
Direct .ZFS and .ZFPRJ formats import support
When importing Z+F laser scan formats, you can select all .zfs files or you can select the .zfprj project. If the scans are arranged into a file chain, you only need
to select one file from the chain and all other files will be imported as well. Please note, laser scans from Z+F Profiler scanner or other scanners in profiler mode
are not supported.
RealityCapture can import .zfprj mosaic images and use them as feature source during the alignment process. This might help to register the unregistered
scans or to automatically find the same features when merging laser scans with images. By default, this feature is enabled (set to "Yes"). You can find it in the Alignment settings as Prefer images as feature source.
To import .zfprj (Z+F project) with mosaic images:
- Import .zprj file to RealityCapture by DRAG AND DROPPING or by CLICKING the
Laser Scan button in the WORKFLOW tab and selecting the .zfprj file you want to import
- Select Feature source as Color (choosing the Intensity option would not import mosaic images from .zfpr file)
- Press OK in order to import files and convert them to .lsp.
NOTE: Import of panorama images located near .zfs data (laser scan positions) is not supported.
Once Imported
The laser-scan import process automatically adds all imported laser scans (.lsp files) into the opened project. You do not need to add them again.
Next time you want to work with the same laser data, you do not need to import them again, simply add the respective .lsp files into your project.
To continue, add one or more laser scans into the project.
You can download and unpack a test dataset from our webpage - click to download.
Import .ptx laser scan files located in the laser scan folder.
Continue
Register laser scans and create a component
