16-bit and HDR images
RealityCapture supports complete processing of 16bit as well as HDR images.
This tutorial will guide you through the process of importing them, using them for texturing, and exporting the texture (with the associated model).
Import
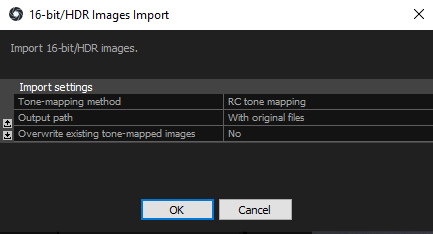
To start your project with 16-bit or HDR images, press the 16-bit/HDR images button in the Workflow tab
– part Import & Metadata. This window will open:

-
Tone-mapping method Choose a codec for tone mapping
of inputs for further processing: either (a special) Local windows codec (you have installed on your machine) by selecting No tone mapping, which will only
convert 16-bit/HDR inputs to 8-bit without any color, contrast, gamma adjustement or you can choose RC tone mapping (recommended, optimized for use in RealityCapture).
-
Output path Specify a target folder for .geometry.jpg files (converted images used for further processing, explained in more detail below).
You can have them saved next to the original files (option With original files) or to a custom location of your choice (option Custom).
Conversion
While importing images, RealityCapture will tone-map and convert the inputs into jpg format. The conversion happens only for processing reasons - it will speed it up and the exported output
will contain all 16-bit or HDR information from the source images.
NOTE: The 16-bit/HDR import process automatically adds all imported and tone-mapped images (.geometry.jpg files) into the opened project. You do not need to add them into the project again.
It is also possible to process original 16-bit or HDR files without conversion to .base.jpg but we do recommend using the previous procedure (with the file conversion). To do so,
just drag and drop the images into RealityCapture’s workspace or start the project using the Inputs or Folder
button in the Workflow tab, as if they were ordinary images.
The following window will show up in this case:

When you press Original, your images will not be converted to .geometry.jpg but imported in their original format.
Now you can continue with standard processing (alignment and meshing).
Texturing in HDR
- To start creating 16-bit/HDR textures, click the Settings button in the MESH MODEL tab -
part Mesh Color & Texture.
- Then navigate to the last line of the panel and set Prefer 16-bit/HDR textures generation to Yes.
- Now go back to the MESH MODEL tab to click the Texture button.
- Two texture layers will be created: one HDR or 16-bit color layer (depending on the file type of the imported images), plus one standard color layer.
They will appear in the 1Ds panel within your model structure – under Model Textures.
NOTE: Textures displayed in RC are tone-mapped and they do not represent the final texture.
Model and Texture Export
-
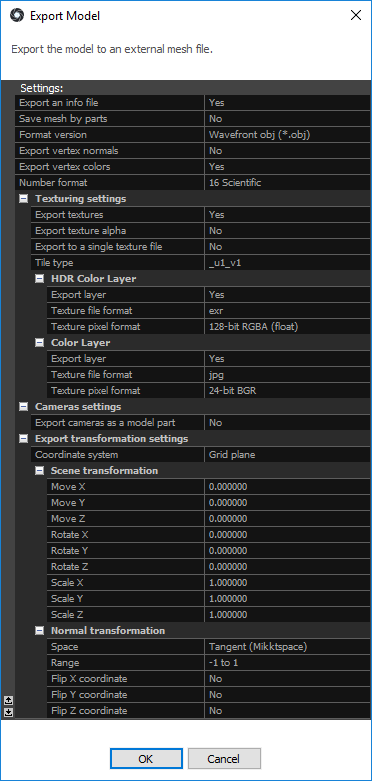
To export the model and its 16bit/HDR texture, click on the Dense Mesh Model button in the Export part of the Mesh Model tab or the Mesh and PointCloud button in the Export part of the SCENE 3D/TOOLS tab.
- Find HDR Color Layer in the opened Export Model dialog window and set Export layer to Yes.
- Choose a desired Texture file format and the Texture pixel format.
- Adjust any other parameters needed and hit OK.


