Model Export
Before exporting a model it is required to create at least one and have it selected; otherwise the buttons used to export models will not be usable. Naturally, model can also be colorized and/or textured before it is exported which will enable the option to export textures alongside with the model.
- To export the prepared model, click on the button in the MESH MODEL or on the button in the SCENE 3D/TOOLS tab under Export panel. Universal Export button in the WORKFLOW tab can also be used to export a model.
-
After the export button has been clicked on, the Windows Save as window comes up. Please be aware that the file name cannot contain Unicode characters and/or spaces. A message will show up in case they are used.
You can select from various output formats: Wavefront (.obj), Polygon File Format (.ply), XYZ Point Cloud (.xyz), Alembic (.abc), Binary GL Transmission Format (.glb), Stereo-litography Format (.stl), 3D Manufacturing Format (.3mf), Universal Scene Descriptor (.usd), Universal Scene Descriptor Zipped, (.usdz), Laser Point Cloud (.ptx), LAS Point Cloud (.las), List of visible parts (.partList), just textures, Autodesk's file format (.fbx), AutoCAD DXF (.dxf), and Collada DAE (.dae).
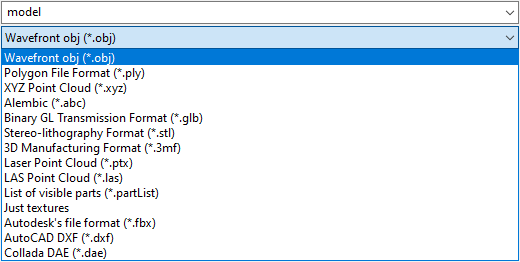
NOTE: Your 5 last used formats come first in the export dialog windows.
- Depending on the chosen save-as-type of a model, you will get one of the following export model options, except for the List of visible parts, which needs no additional export settings. Please also note that some parameters may be omitted - for example when you are exporting a non-colored or non-textured model, the additional options for exporting colors/textures will not be shown.
General Settings
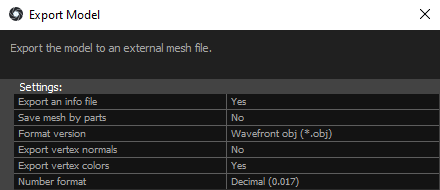
Export an info file If set to Yes, creates an XML file (.rcinfo) which contains important information about the internal coordinate system and relations to the coordinate system in which the models coordinates are exported. It also contains export parameters. This file is useful in two cases:
-
You can use the export parameters as a definition for the Command Line Interface command "-exportModel". All you need to do is copy the text in the ModelExport tag from the created .rcinfo file and paste it into an empty .xml file. Then just use this .xml file with the command "-exportModel" as defined here. You can find an example of such .xml file on this page.
-
It is important when you want to export a model, post-process it and import it back to the same component. You can then, for example, texture the postprocessed model.
The application automatically searches for the info file and if it finds it, then it will use the information to correctly place the model to the internal coordinate system. The info file must be named the same as the imported model name plus it must include an additional ".rcInfo" extension, e.g. myObject.obj.rcInfo.
Save mesh by parts Export model by parts in which it was created, or export it as a singleton.
Format version Even though this setting is enabled for various formats, it is relevant only when exporting an model as .fbx. Options for .fbx are binary and ASCII: FBX201100, FBX201200, FBX201300, FBX201400, FBX201800, FBX201900 and FBX202000.
File type Offers Binary (number format) or ASCII (text format) options when exporting in .ply format. The binary format takes less space than the ASCII one.
Export vertex normals A normal is vector perpendicular to the tangent plane of the sruface. This can be useful for example when later illuminating a model according to the normals' orientations to the model surface.
Export vertex colors If enabled, model's vertices are going to be exported with the color information.
Export materials If enabled, material information is going to be included in the export. Usable only when exportin the .fbx format.
Number format Select a number format of your export. The options are: Decimal, Scientific, and General. Decimal and Scientific both contain maximum 17 digits and trim zeros,
but they differ in the way that numbers are displayed. General uses Decimal or Scientific depending on which is shorter.
Classification export If .ply, .xyz, or .las format was chosen, it is possible to export a classification created on the model which is being exported.
Generate multi-scan PTX Models exported as .ptx can be exported as a multi-scan. This means that all laser scans will be exported as a single file.
Output Decimal Precision Define the decimal precision of values stored in the .ptx file.
Texturing Settings

Export textures Set to Yes if you wish to export textures. This will enable other texturing settings. If model has multiple textures, it is possible to choose which ones are going to be exported.
Embedded textures This option appears if the model file format support embedding. If you choose Yes then the textures will be embedded into the model file. This means you can deliver a scene as a single file.
Export texture alpha An alpha mask defines which pixels contain texture and which do not.
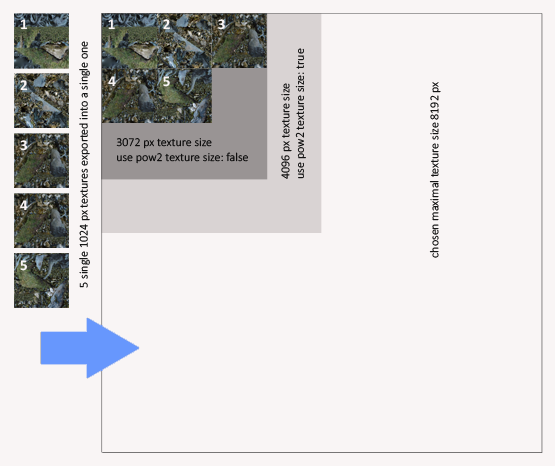
Export to a single texture file If set to No, three Tile type options show up: _u1_v1, (u,v) and UDIM. Exporting more textures into a single one will stitch all the textures (square-shaped) together into a single image. It can be especially useful when handling a very large model. See also the picture below.
Texture maximal side These options become available just when Export to single texture file is set to Yes: 512, 1024, 2048, 4096, 8192, 16384, 32768 or 65536 pixels.
Use pow2 texture size Only available when exporting a single texture. Setting it to Yes forces the exported texture to be assembled out of single textures lined up to the nearest multiple/dividend of 2 of the chosen maximal texture size, while preserving the square shape of the final texture and the smallest surface without decreasing its resolution (except the case in the warning above). Have a look at the picture below in order to see how it functions:
Texture file format Choose format in which textures are going to be exported.
Texture pixel format Choose a pixel format for the exported texture(s): 24-bit BGR, 32-bit BGRA, or 64-bit RGBA.
Export Cameras Settings
Most of these settings are available only for .fbx and .abc formats.
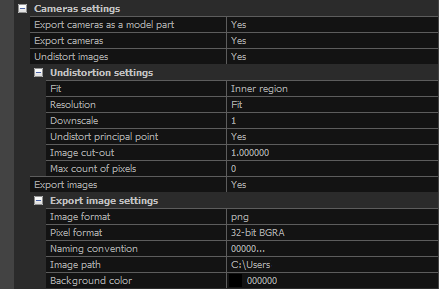
Export cameras as a model part Set to Yes if you want to change your cameras into mesh.
Export cameras Set to Yes if you want to export cameras' positions, orientations and focal lengths with the model.
Undistort images If set to Yes, Undistortion settings will be enabled and image information will be exported with reference to undistorted images.
Export images If set to Yes, images registered in the component from which model was created will be exported with the model. It will also enable Export image settings.
Undistortion Settings
Most of these settings are available only for .fbx and .abc formats.
Fit Defines the section of the undistorted image considered for output.
Resolution Specifies the resolution of the image. When set to Fit or Preserve, Downscale setting becomes available. If set to Custom, settings Custom width and Custom height are offered.
Undistort principal point Control the position of the center of the undistorted image.Set to Yes to shift the optical center of the image into the actual center of the exported image.
Image cut-out Define which fraction of the image is considered for the undistortion.
Max count of pixels Define the maximal resolution of the image in pixels. Use zero (0) for no limit.
More information about undistorted images can be found here.
Export Image Settings
Image format Format in which images are going to be exported.
Pixel format Choose a pixel format for the exported images: 24-bit BGR, 32-bit BGRA, or 64-bit RGBA.
Naming convention Choose naming convention for the exported images.
Image path By default exported images are exported into the same folder as the model. You can choose a different path by changing this setting.
Background color Set the background color of the exported images.
Export Transformation Settings
RealityCapture allows moving and scaling the exported model. This is useful if you want to change units from meters to centimeters. For example, setting the Scale X/Y/Z to 10 will make the model 10 times bigger.
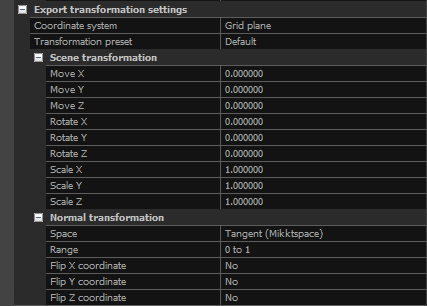
Coordinate system Choose coordinate system in which model is going to be exported.
Transformation preset Applies a predefined Scene transformation and Normal transformation settings.
Scene transformation Alter model's position, orientation and scale.
Normal transformation Alter all exported normal maps.
Coordinate system
Grid plane - as seen in the 3Ds view.
Project Output - this option is available only when the model is geo-referenced. You can choose the output coordinate system in the WORKFLOW
tab / / Coordinate systems.
Shifted project output - same as Project Output, just moved to the centre of the scene.
Same as XMP – export in the same coordinate system as for the exported Metadata (XMP). The option is available also for non-georeferenced models.
Scene transformation
Move X / Y / Z Move the object in any direction by a unit defined in the coordinate system. It is set to meters by default.
Rotate X / Y / Z Define Euclidean model rotation around the respective coordinate axis (from -180 to 180 degrees).
Scale X / Y / Z Scale coordinates of the respective coordinate axis by changing the default scale number.
Normal transformation
Space Coordinate system of the normal vectors. Selecting World yields normals in the same coordinate system as the model vertices. The Object option is the same as World except that the rotation specified in Scene Transformation is not applied to normals. The Tangent (Mikktspace) option is compatible with several third-party rendering systems. For best results, always enable Export vertex normals when exporting tangent space normal maps.
Range Determines what range of floating-point values is being used to represent normal vectors. Has no effect when a non-floating point Texture pixel format is selected.
Flip X / Y / Z coordinate Mirrors the direction of the normal vectors. Flipping the Y coordinate is needed to correctly use the exported normal maps in certain third-party rendering systems.