Adjusting Coloring and Texturing Settings
If you need to adjust any parameters of model coloring/texturing, the Settings of both are accessible within the MESH MODEL tab - section Mesh Color & Texture.
Texturing and its quality is strongly dependent on how UV maps are generated. RealityCapture offers a method where you can define a desired texel size w.r.t. coordinate system units, e.g. the texel can be 5 mm big, or you may set the maximal texture resolution and count of textures which can be used to texture a model. Alternatively, you can import UV coordinates with the model (read more).
Default Unwrap Parameters
You can change the default unwrap parameters, which will be used before the texturing, in case the model was not unwrapped beforehand. There are two methods now: Geometric and Mosaicing based. Geometric is the legacy fast unwrap method. Mosaicing based (experimental) is the new method producing fewer UV islands but it is slower than the geometric method.

- Gutter Represents a number of pixels of a chart border in a texture image. Gutter is important for avoiding visible artifacts on a model during rendering. Many rendering engines use techniques like mip-mapping, where the texture is downscaled several times to create an image pyramid. If the engine renders texture from higher pyramid levels, then a color from one chart can bleed to another chart in the interpolation process. This can happen just in case you do not have the gutter between the charts large enough. The default value 2 is enough to avoid this type of artifact in most rendering engines.
- Minimal texture resolution Set the minimal possible resolution of the unwrap. You can choose from 512x512, 1024x1024, 2048x2048, 4096x4096, 8192x8192 and 16384x16384. This value cannot be higher than the value for the Maximal texture resolution.
- Maximal texture resolution Set the maximal possible resolution of the unwrap. You can choose from 512x512, 1024x1024, 2048x2048, 4096x4096, 8192x8192 and 16384x16384. This value cannot be lower than the value for the Minimal texture resolution.
- Large triangle removal threshold Let us assume that you select 10. Then, in case that a triangle's edge is 10 times longer than the average edge length of all edges of the model, the system will unwrap it so that the triangle is mapped to just 1 texel.
- Unwrap method Defines a method which will be used to unwrap a model. You can choose between Geometric and Mosaicing based.
- Style Defines a strategy which will be used to build a UV map based on the chosen Unwrap method.
- Defragment charts Enable this setting to create larger UV islands during the unwrapping process using the approach of Maggiordomo, Cignoni and, Tarini (read more).
Geometric Unwrap Method
When using the geometric method, it is possible to set the maximal texture count or to control the texel size.
Maximal Texture Count Style
This style is useful if you have restricted the model to a particular count of textures. Set Style to Maximal texture count, and the Maximal texture count setting will show up. The texel detail is adjusted automatically so that the texturing fits into the selected maximal number of textures within the selected maximal resolution.
Controlling Texel Size
Use the Fixed texel size or Adaptive texel size style if your intention is to deliver a model with pre-defined visual precision, e.g. 1cm resolution for creating a true ortho-photo map. There will be so many textures how many are needed to texture the model with the selected texel size.
Both unwrap styles share some common settings, here are the settings related to this style:
- Coordinate system defines a reference coordinate system which defines a measurement unit. Change the project coordinate system to change this value (read more).
- Unit type shows the selected coordinate system unit, e.g. meter, inch or "units" if the unit type is not known.
- Texel size Here you can set dimensions of a texture image pixel. When using the custom option, set this value, for example to 0.01 to make a 1cm texel if the coordinate system unit is a meter. Once you have a model calculated, you can use the Unwrap tool to estimate the minimal reasonable resolution.
For practical reasons, e.g. if you are scanning a statue on a wider square, you may want to have finer details closer to the statue and 1cm detail elsewhere. Choose the Adaptive texel size style where you can define ranges where your texture must fit. The RealityCapture unwrap algorithm will use the 3D model, camera poses and inputs resolution to calculate optimal texel sizes and it will clamp the estimated texel into a range defined by:
- Minimal required texel size The smallest dimension of a texel. This is useful when moving with a high-resolution camera between objects to avoid wasting texture pixels.
- Maximal required texel size Define a maximal texel size, i.e. there will not be bigger texels. This is practical if you want to paint into the texture later.
Mosaicing Based Unwrap Method
The Style options change for the mosaicing based unwrapping. You can choose between Maximal texture count and Quality.
- Maximal texture count This style is useful if you have restricted the model to a particular count of textures.
- Quality Choose from done of the predefined quality options or set a custom value.
Color and Texture Settings
In the coloring and texturing settings it is possible to set the resolution of the imported textures, and various parameters that are altering the texturing and coloring process.

Imported UV Maps
Imported models (read more) may define UV coordinates and hence it is not necessary or even not desired to recalculate them. However, the texture resolution might not be defined during import, e.g. when a mock-up texture file is missing.
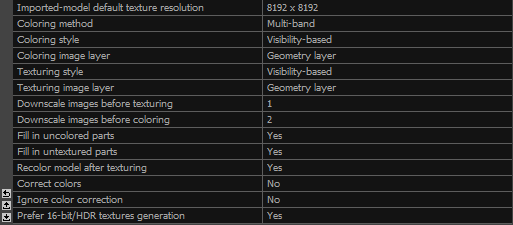
- Imported-model default texture resolution This is a default value when importing a model with unknown texture resolution. You can choose 512x512, 1024x1024, 2048x2048, 4096x4096, 8192x8192 or 16384x16384. This setting is ignored when importing a model in the FBX format.
Texturing Algorithm
Use the following settings to set additional texturing and coloring settings.
- Coloring method Linear results in average values. Multi-band (default) uses several channels, it divides images into more frequencies, which are joined together afterwards. Lower frequencies, which can be joined linearly even in bigger surroundings, carry color and brightness. Higher frequencies carry detail, for example texture grain size, and are joined in a different optimized way.
- Coloring style While the Visibility-based style is fast and sharp, the Photo-consistency based style is slower with more complex results.
- Coloring image layer Choose the image layer used for coloring. By default, the geometry layer is used.
- Texturing style The Visibility-based style is fast and sharp, and the Photo-consistency based style is slower with more complex results. Mosaicing based style (experimental) divides the surface of the model into areas and a single image source is used to texture each area and blended at the seams. This is in contrast with blending methods that create textures by averaging over multiple image sources. It creates sharper textures than Visibility-based style, but it's slower. It is also not recommended with larger datasets. Maximal, Minimal and Average intensity will give a point an intensity value (monochrome) as a result of all of the cameras that see that point
- Texturing image layer Choose the image layer used for texturing. By default, the geometry layer is used.
- Downscale images before texturing The number that you type here represents a multiple by which you automatically scale down images before texturing. Whereas using number 1 means no change in scale (100% resolution), using number 2 means that each side of an image will be 2 times smaller (25% of the original image resolution), etc.
- Downscale images before coloring This number scales down an original image before coloring, similarly to the one mentioned above. The recommended and the default value is 2.
- Fill in uncolored / untextured parts This feature is ideal for overlap checks, when there are some parts in a model not covered by a camera or laser scan. Set the parameter to True when you wish the application to intuitively fill in the areas of a model, which have not been covered by the input images.
- Recolor model after texturing Enable this option to calculate vertex colors from textures - you will get coloring and texturing with a single click on Texture (F9).
- Correct colors Automatically compensate the color, brightness and contrast differences across all images in the selected component.
- Ignore color correction Ignore color correction of images during coloring/texturing.
- Prefer 16-bit/HDR textures generation See 16-bit and HDR images for more details.
Texturing Properties of an Already Textured Model
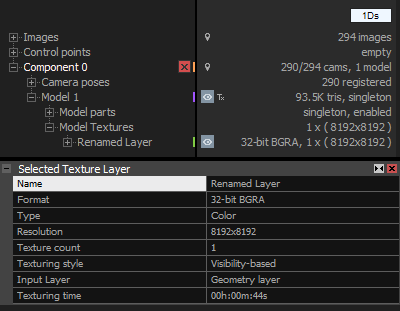
You can browse the following texturing properties after a model is unwrapped or textured, or imported. Just select a model in the 1Ds view. A panel of the selected model will appear. Expand the Texturing group of the panel.
- Coloring style Which style or how the coloring/texturing was executed.
- Unwrapping style Which unwrapping style was used.
- Unwrap method Which unwrap method was used.
- Count of textures Number of textures.
- Texture resolution Resolution of textures. All textures must have the same resolution.
- Chart gutter size represents the number of pixels of a chart border in a texture image.
- Texture utilization (with gutter) Percentage of used texels.
- Optimal texel size Size of a texel in 3D so that it corresponds to the minimal detail captured by images.
- Texture quality equals to the percentage of a texel size w.r.t. the optimal texel size. It says about how the texture is detailed w.r.t. the maximal detail that you can get from images.
- Texel size Size of a texel in 3D in actual units.
Texture Layers
When an unwrap or a texture is made, you can select a texture layer in 1Ds view under your model under Model Textures.

The Selected Texture Layer panel displays settings which were used to create the texture layer. It is possible to change the Name of the layer by clicking on it and writing down a new name.
See also:
- Learn to import UV maps click here
- Learn how to change UV maps for already textured models click here