Extending Camera Database
This part of RC Help tutorials covers how to add a new camera into the database and how to define optical distortion.
The camera database holds various camera properties, such as camera sensor size or lens distortion parameters.
It helps in resolving prior camera parameters when image metadata is incomplete, e.g., it does not have a 35mm equivalent focal length.
Also, it is used to set proper lens distortion priors to cameras with excessive lens distortion, such as GoPro.
We recommend adding or modifying the existing camera information if you know what you are doing and also to do it in
a controlled environment to achieve the best results.
When Should I Add a Camera Database Entry?
It is not necessary to add every camera to the database. If a camera stores the 35mm equivalent focal length into an image file (e.g. EXIF or XMP),
the application will read it from there. You should add entry if:
- your image files contain focal length other than 35mm equivalent, e.g. with respect to its chip size.
- lens distortion is directly noticeable in input images - adding priors helps register images more precisely.
- a yellow exclamation mark appears in the 1Ds panel next to an image when the system has incomplete camera information.
Procedure - Higher Lens Distortion
Follow these instructions to add a new camera to the camera database. If your images do not suffer with a visible lens distortion and you would like
to get rid of the yellow exclamation mark, then scroll down to the Camera Sensor Size and just define a proper chip size.
- Take some photographs of a box covered in newspaper (something with a lot of texture so that the images are broadly covered with natural feature points)
and load them into a new project.
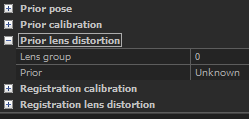
- Set Prior lens distortion / Prior to Unknown, since great distortion is expected. It can be set when selecting an image or more of them in the 1Ds panel.

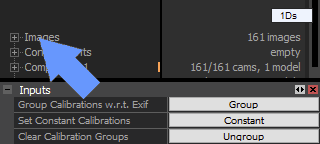
- Group the cameras in order to make the scene better conditioned. Click Group in the Inputs panel which shows up when clicking once on the
Images root in the 1Ds panel (see the screenshot below). For more information on grouping, check Camera Settings.

- To make it easier, select the Division lens model, which has only one parameter to set, compared to other distortion models.
You can find it in ALIGNMENT tab / Settings / Advanced / Distortion model.
For more information about distortion models click here.
If you want to create hard priors (i.e. of exact quality), then we recommend using richer lens models,
such as Brown3, Brown4, Brown3 with tangential2, or Brown4 with tangential2.
- Proceed with ALIGNMENT tab / Align Images (F6).
- Have a look at the optics' parameters: either in any 2Ds image view (focal and λ) or in the 1Ds, 2Ds, or 1D panel under Registration part / Calibration.
- Open the "sensorsdb.xml" file, which is located in ProgramData on the Windows system drive, which is typically located in C:\\ProgramData\Capturing Reality\RealityCapture\sensorsdb.xml.
Add a new item and define these parameters of the new camera: the camera model name and numbers from step no. 6,
focal and c1 (camera distortion). Do not forget to changes.

The system will set camera priors automatically this step onwards.
Camera Database File
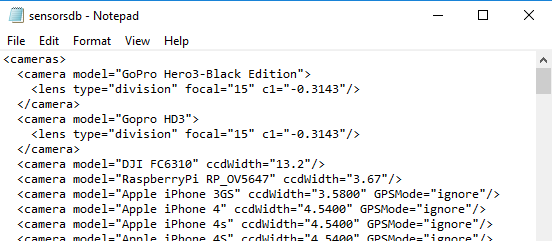
Camera database is an XML file with a human-readable structure. It is structured as seen in the picture below. The camera entry defines a camera model, camera basic properties such as sensor size and lens properties for different vendors and different focal length.
Camera Sensor Size
As an example, take iPhone 4 camera. iPhone 4 stores into metadata focal lengths in units relative to its sensor size.
To calculate a 35mm equivalent, we need to know the real sensor size. This entry gives this information and it helps calculate the 35mm equivalent focal length.
Some cameras also include a chip size in image metadata. In such case RealityCapture can calculate the 35mm focal length even without a camera database.
TIPS:
- RealityCapture displays a camera model in the 1D and 1Ds image/selection panels.
- Search the Internet for the camera chip size. Camera vendors make this information available.
- Define a ccdWidth to get rid of the yellow exclamation mark.
Ignore exif GPS
If an image includes GPS coordinates in the exif, it is possible to turn on/off their use per camera.
Lens Distortion
The camera database allows defining lens priors. The system automatically reads them when an image is imported and sets them to images.
- The following figure shows a simple lens prior: RealityCapture searches for a database entry with the camera model and assigns
a division model with coefficient c1 to the image priors if the imported image has a 15mm focal length.
You can define different distortions for different focal lengths, e.g.:

- Different lens body: Many cameras have an option to use different lenses which might have a different distortion.
RealityCapture allows defining priors for every lens body separately. A camera lens model can be read in the 1D or 1Ds view, when an image is selected.
The system uses a camera model, a camera lens model and a focal length to match the database entry.

If an image with the same camera and lens model, but with a different focal length is imported, then RealityCapture automatically calculates
values of the lens distortion from other data available in the database.
Exact or Soft Prior?
By default, RealityCapture sets priors from the camera database as a soft prior. It means that the system will optimize their values to get a more precise result.
In such case you need just a rough estimate of parameters and a single-parameter division model is a very good choice for this.
Alternatively, you can define exact - hard priors. The system will not change this value further. This is recommended for fixed setups.
To define an exact prior, add quality="exact" to the lens model attributes:


