Detect Markers Tool
This tool enables you to automate the process of placing control points into your images. The process is thus much quicker and more accurate
than locating them by hand. Targets of the selected type are detected in imported images, creating a control point for each target.
All you need to do is prepare some suitable markers (you can use our built-in generator for this purpose) and place them in your scene before taking pictures and RealityCapture will do the rest for you.
Procedure
- Click the Detect Markers button in the Optional part of the ALIGNMENT tab. It can also be accesed in the IMAGE 2D/TOOLS tab.
- Now you will find these settings in the Detect Markers Tool panel in the 1Ds panel:
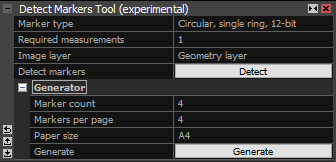
Marker type Type of markers to be detected. Their types are listed above.
Required measurements Newly detected markers that contain fewer images than the number specified in this setting are discarded. This option effectively filters out markers that are found in fewer than the specified number of images.
Image layer You can select in which image layer you want to detect markers. You can choose the image layer based on your inputs.
Marker count Here you can specify a number of markers you want to be generated. The maximum number of markers that can be generated is determined by the marker type (see the table above).
Markers per page Specify a number of generated markers to fit into a page.
Paper size A size of a paper you wish to print the markers on.TIP: Set Required measurements to a value greater than 1 in order to detect markers robustly. - If you want RealityCapture to generate markers for you, choose their count and number per page, the paper size and click on .
- In order to detect markers in a subset of input images, select the required images.
- You can now click on the button in the Detect Marker Tool panel.
- A new control point is created for each marker that has been detected, provided that there is no control point with the exact same name.
What Else
- You may also automatically get some suggestions of control points to validate or discard in the Control points list in the 1Ds panel.
- Existing control points with matching names are augmented with new measurements but keep all their other properties.
- Newly created control points are tie points, since the physical location of the points is not known. However, it is possible to change the type of control points after the detection.
- Ground control points can be located via marker detection by assigning them a suitable name and running marker detection afterwards.