Scaling a Scene
In general, there is a problem to determine the scale of a scene with photogrammetry methods. Some other prior information must be provided. In fact, just a single number is needed to scale the scene properly. In RealityCapture you have the possibility to scale your 3D model uniformly in all directions at the same time. Non-uniform scaling with a separate factor for each axis direction is not allowed. There are few ways to scale the scene.
Distance Constraint
The simplest way to scale a scene is using the distance constraint tool. This tool is accessible in the IMAGE 2D/TOOLS tab or in the Registration & Sparse Point Cloud part of the SCENE 3D/TOOLS tab as a Define Distance button. It can also be found in the Constraints part of the ORTHO 2D/TOOLS tab as an Add Distance Constraint button. For an easy access, you can also use the F4 key on your keyboard. This tool defines distance between two control points in an interactive way. Please note that these two control points must be assigned to two or more images each.
- Place at least two control points prior to adding the distance constraint.
- Activate the tool.
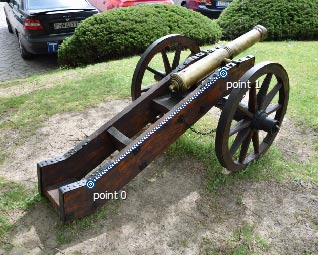
- Select an image in the 2D image view which contains control points between which you want to define a distance.
Alternatively, select a layout with two or more 2D image views and select more images so that you can see both end points.
- Click and hold the left mouse button on any of the two end points.
- Move mouse cursor to the second control point (in any view). You will see a dotted line starting in the first point
and ending at the mouse cursor pointer. The dashed line end will automatically snap near the control points and the application will automatically
highlight them.
- Release the mouse button to confirm the creation.
NOTE: It is also possible to interactively define distances on an ortho projection in the 2D view or they can be placed directly onto a point cloud or a model in the 3Ds view.
This procedure will create a distance constraint between two points. However, you have not defined a physical distance between two end points yet. To do so, you need to set the distance in the Selected constraint(s) panel which opened right after you created the constraint. The constraint is not used in the alignment before you define a distance by setting a non-zero value to the Distance property. Add more distance constraints to get more accurate results. If you disable a constraint, it can still serve as a ruler.
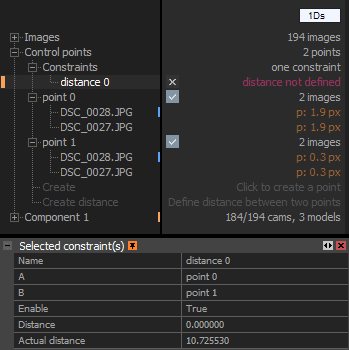
You can edit constraint properties in the 1Ds view under Control points' tree node.
Direct Distance Constraint Definition
An alternative to the interactive way is the direct creation of a distance constraint in the 1Ds view under the Control points' tree.
- Place at least two control points prior to adding the distance constraint.
- Expand Control points' tree node in the 1Ds view.
- Click Create distance to create an empty constraint.
- A panel with the constraint properties will be opened automatically.
- Define a distance.
- Enter two end point names to the A and B fields.
Import Distance Constraints
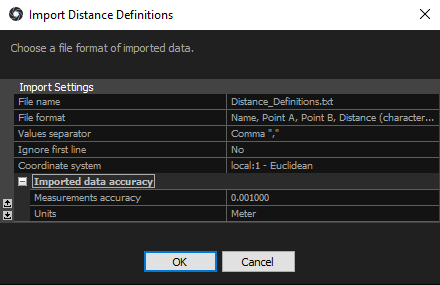
You can also import Distance Definitions in the Import & Metadata part of the WORKFLOW tab. An import dialog will appear immediately:
- File name The name of the file containing distance definitions.
- File format Define order and type of the values in the distance definitions file.
- Values separator Separator used to separate the values found in the distance definitions file. Qualifiers are also supported which means that you can place each field in double quotes ("") to signify that it is the same field.
- Ignore first line If the file contains a header, RealityCapture can ignore the first line of the file. Lines that begin with symbol # are automatically skipped.
- Coordinate system The coordinate system in which the imported distance constraint is placed.
- Imported data accuracy If the file containing distance definitions doesn’t include accuracies, it is possible to define them as Measurements accuracy. It is also possible to define Units in which the imported distance constraint and its accuracy values are written in.
-
You can define your own file format, different values separator, comment symbol or qualifiers in the distancedefinitions.xml which can be found in
the application installation folder. You can find the instructions on how to edit the distancedefinitions.xml as well as the list of supported values for import here.
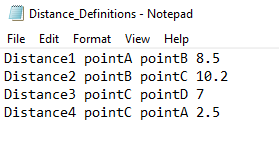
- A sample of the 'Name, Point A, Point B, Distance' distance definitions file with space-separated values:
- After clicking OK in the dialog shown at the top of this page, your distance definitions will be imported into your project.
Once you are satisfied with the newly-defined distance, click the Update
or the Align Images (F6) button in the Alignment tab.
The Update changes solely the coordinate system of the currently selected component and it also updates the scale of all children models,
whereas the Align Images button creates a new component.
You can also import Distance Definitions through the Workflow tab.
The required format for this text file is defined in the file distancedefinitions.xml which can be found in the application installation folder.
Ground Control Points
Another option to scale a scene is to define a proper coordinate system of the scene. This is possible by adding ground control points and defining 3D location of them.
In general, you will need 1 to 3 points visible in at least two different images. So in fact, you need to have 2 to 6 constraints.
However, RealityCapture integrates advanced solvers which can solve the scene scale and orientation just by creating any 5 independent measurements, e.g. 5 images
observed from 5 different non-overlapping points. For more information see the geo-referencing section (read more).
- Define a single ground control point to define the scene origin. Create a single ground control point and assign X/Y/Z coordinates to it.
- Define two ground control points (GCPs) to define scale. This can be achieved by placing one GCP to the origin and the second one to (distance,0,0).
- Define three ground control points to define a complete coordinate system. This is possible if you can identify an orthogonal corner in your scene.
Scale Using Camera Priors
If a distance between two or among more cameras is known, then this information can be used to scale the scene, too. Alternatively, camera centers can be known
from GPS or flight logs and then the scene will come properly scaled automatically.
For more information see the camera priors help section (read more).
In case just a distance between two cameras is known:
- Add the position prior and set it to the origin.
- Add the position prior to the second camera and set it to (distance,0,0).
Another option is to fix a camera position and orientation completely. The easiest way to do this is using XMP files (read more).
Since there are few methods how to scale the scene, for some of them there is a video tutorial, which can provide more information:
- Creating two control points which triangulate to 3D and define a distance constraint.
- Directly defining a coordinate system using ground control points.
- Adding a camera prior to the camera centre.
- Using an XMP file to fix one camera or more camera positions or to define camera priors.
- Adding a terrestrial laser scan.
- Importing markers with meta data. This is essentially the same as defining ground control points.
- Scaling a scene on export.