Real-time Scene Renderer
A 3D scene view (3Ds) can display scenes or its objects in more rendering modes. You can switch between render modes in the Scene Render section of the SCENE 3D/VIEW tab. While render modes affect how the model is going to be displayed in the 3Ds view, there are some other options that can be set in the Scene Render section:
- Show Grid Grid is displayed by default. To hide it from the 3Ds uncheck this box.
- Show Shapes Check this box to display shapes created on an ortho projection on the model. Find out more about the these shapes here.
- Bright Background Make the background brighter by checking this box.
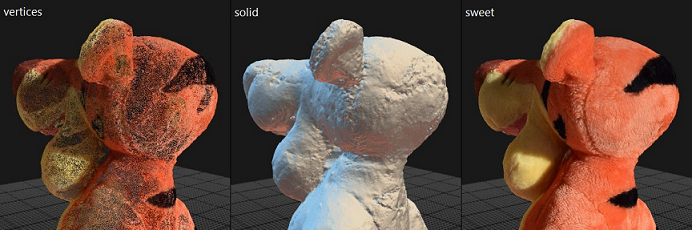
Render Modes
The following modes are available:
- Vertices which renders just a reasonable subset of the model vertices with baked colors. You can set the size of the subset in the application settings.
- Solid for flat shaded triangles lit with 4-directional dynamic lights.
- Sweet displays the best out of your results. Here we have 2 options: the model is either colored with baked colors (when there is no texture), or textured (when a texture exists).
How It Works
First, you need to calculate a mesh - so you must have the images aligned, the model calculated and the 3Ds displayed in the layout.
If you see just a point cloud, then either you have only aligned images so far, or the model is way too big to fit into the system memory. In the latter case, read further to find out how to render your big data.
For a smooth viewing experience, the following operations are performed:
- While a model is being loaded from the drive into the GPU, a model point cloud is being displayed.
- Once the model is loaded with textures, the point cloud disappears.
- Textures are scaled to fit a GPU (16k texture at most), therefore the visual display may be of a lower quality than in your model.
In Progress
Every GPU/CPU/RAM/VRAM-intensive calculation (for example alignment, reconstruction, or texturing) switches the rendering mode temporarily back to the low-demanding mode, i.e. to the point cloud rendering.
Once the process is over, the system automatically switches back to the previous mode. Of course, if it is possible depending on the system resources.
For Your Convenience
For a better editing experience, back-faced triangles are rendered always. They are rendered in a different color, or better said, with the same shade of color as the back-faced geometry rendered with the orthographic projection tool.
You can choose their color and transparency in the Ortho Projection (F11) tool.
Restrictions
There are no limits, when it comes to the number or size of textures. They are scaled just what is needed.
The number of triangles displayed in solid or sweet mode is set in the application settings (WORKFLOW tab / Application). There are 3 settings, with options to use 20%, 40%, or 80% of your VRAM. The number of triangles displayed will depend on the amount of VRAM on your GPU. For example if your GPU has 16GB of VRAM your options would be 72mill (20%), 143 mill (40%), 285 mill (80%).
If you exceed the set limit, only a point cloud will be displayed, while the render mode will be preserved. However, you can use the Clipping Box tool in this case to display smaller parts sections of your model. You will find this tool in the View Tools part of the SCENE 3D / VIEW context tab.